First job I had to do when I started to administer the computer lab in my school was to add users and which is a never ending process. I started in the beginning by adding each user graphically in my Windows Server 2003 standard edition and create their home directories, share them and give appropriate permission. It was a lot of job. I needed a way to automate things. The best thing I realised was the use of VBscript. VBScript-(or Microsoft's Visual Basic Scripting Edition) is a powerful interpreted scripting language that brings active scripting to a variety of environments, both client and server side. But I will not go into VBscript and simply explain the way I have used it to accomplish my work. O'Reilly’s Windows Server Cookbook by Robbie Allen was of great help to me. Anyone, who wishes to use this code, will be able to use it with some modification in it. I am using an excel file to store the details of the student. Sample Excel sheet is shown in the figure.
Figure 1: Sample Excel Workbook |
| VBscript file is as follows:(Creator.vbs) ' ------------------- SCRIPT CONFIGURATION -------------------------- strDomainName="winserver.myhome" strExcelPath = "c:\data.xls" strFolderPath = "" intStartRow = 2 ' -------------------- END CONFIGURATION ---------------------------- '----------------------READING FROM EXCEL-------------------- On Error Resume Next set objExcel = CreateObject("Excel.Application") if Err.Number <> 0 then Wscript.Echo "Excel application not installed." Wscript.Quit end if On Error GoTo 0 objExcel.WorkBooks.Open strExcelPath set objSheet = objExcel.ActiveWorkbook.Worksheets(1) intRow = intStartRow do while objSheet.Cells(intRow, 1).Value <> "" '----------------------ASSIGN VARIABLE FROM EXCEL-------------------- strFirstName=objSheet.Cells(intRow, 1).Value strLastName=objSheet.Cells(intRow, 2).Value strUserName=objSheet.Cells(intRow, 3).Value '---------------------------CREATING FOLDER-------------------------- strFolderPath = "C:\" & strUserName set objFSO = CreateObject("Scripting.FileSystemObject") objFSO.createFolder(strFolderPath) 'The following code creates a user object and sets several attributes. '--------------------------------------------------------------------- set objParent = GetObject("LDAP://" & strDomainName & ".com") set objUser = objParent.Create("user", "cn=" & strUserName) objUser.Put "sAMAccountName", strUserName objUser.Put "userPrincipalName", strUserName & "@winserver.com" objUser.Put "givenName", strFirstName objUser.Put "sn", strLastName objUser.Put "displayName", strFirstName & " " & strLastName objUser.Put "homeDirectory", "\\gdhome\" & objUser.Get("sAMAccountName") objUser.Put "homeDrive", "z:" objUser.SetInfo objUser.SetPassword("") objUser.AccountDisabled = FALSE objUser.SetInfo '------------------ SHARE FOLDER AND GRANT PERMISSION ---------------- Set wshShell = WScript.CreateObject("Wscript.Shell") strcmd="c:\mybat.bat " & strUserName & " " & strFolderPath & " " & "winserver\Administrator" WScript.Echo strcmd wshShell.Run strcmd intRow = intRow + 1 loop objExcel.ActiveWorkbook.Close objExcel.Application.Quit Wscript.Echo "Done" Most of the codes are self explanatory but when it came to the section of “SHARE FOLDER AND GRANT PERMISSION”, I could not use the VBScript anymore and had to depend on a DOS Batch file mybat.bat. Codes for mybat.bat net share %1=%2 /grant:%1,Change subinacl /share %1 /grant=%3=F How to run it: In my case all the files are located in the c: root directory. I simply run the script by double clicking the script and wait for the message “Done”, which takes less than a minute for creating around 50 users in my machine.  Figure 2: C Drive before running Script
Figure 3: C Drive after running script
Figure 4: Users created in AD
Figure 5: File permission of mahendh
Figure 6: General tab of user properties
Figure 7: Profile of user ISSUES that is still bothering me are:
|
| |
| |
| I will be grateful to you if you can help me improve the codes and solve those problem. |

This blog is aimed to provide help to computer enthusiast, specially for Linux lovers.
Friday, July 22, 2011
Automating User Creation With VBscript In Windows Server 2003


Thursday, May 5, 2011
How to configure Tata Photon Whiz or Tata Photon Plus on Linux OS
Requirement:
- Laptop or Desktop running on Linux OS
- Working Tata photon whiz or Tata photon plus modem.
STEP 1:
First off all you need to install the PPP dialler on your computer. To do so, open the Terminal and type the following command:
On Linux Mint / Ubuntu:
sudo apt-get install wvdial
or(for root user)

On RedHat Linux: (for root user)
yum install wvdial
On Opensuse / Suse: (for root user)
zypper install wvdial
STEP 2:
Connect the Modem to the Laptop/Desktop and ensure that the device is properly connected. Now open the Terminal and type the following command:
On Linux Mint / Ubuntu
sudo wvdialconf /etc/wvdial.conf
or(for root user)
wvdialconf /etc/wvdial.conf
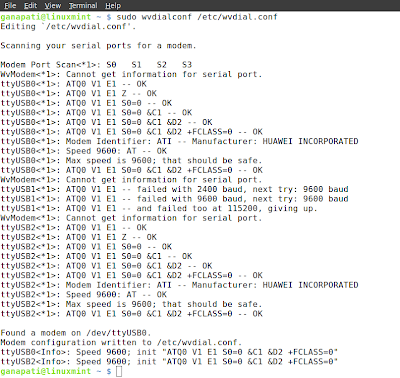
On RedHat Linux / Opensuse / Suse (for root user)
wvdialconf /etc/wvdial.conf
STEP 3:
We need to edit the file /etc/wvdial.conf . We can use vi editor or any other text editor but as most of us are more comfortable with gedit we can type the following command:
On Linux Mint/Ubuntu
sudo gedit /etc/wvdial.conf
or(for root user)
gedit /etc/wvdial.conf
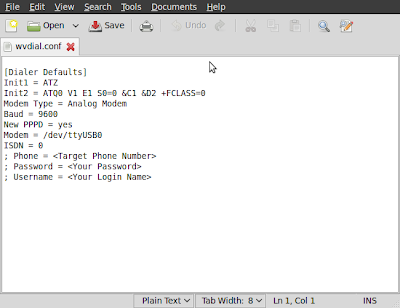
On RedHat Linux / Opensuse / Suse (for root user)
gedit /etc/wvdial.conf
Make the following changes in the configuration file.
1. Delete the semi colon before last three lines phone, username, password
2. Enter phone no #777 username and password internet.
3. add this 2 extra lines in the configuration file at the last
Init3 = AT+CRM=1
Stupid Mode = 1
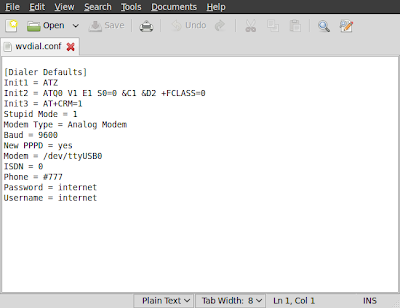
We are now done.
To connect to the internet , type the following command on the Terminal
On Linux Mint / Ubuntu
sudo wvdial
or(for root user)
wvdial

On RedHat Linux / Opensuse / Suse (for root user)
wvdial
Open your favourite browser and start browsing.
Press Ctrl + C to end the call.
Tuesday, May 3, 2011
Reviewing Blogs Before Posting
Visit again for updated blogs.
With Regards
Ganapati Das.